
How to Add Contact Form On WordPress
ToAdd Contact Form On WordPress we all know that every website needs a contact form so that anyone can contact the owner about products and services. If you want to know how to add a contact form on your WordPress site, then connect with us. In this post, we will explain about How to Add Contact Form On WordPress.
Why Do You Need a Contact form?
This is one of the common questions that arise in the mind of people that why do I need a contact form?
Most of the people think that there is a need for code knowledge to add a contact form on the website.
But it’s not the truth. This post will help you in knowing the steps of adding a contact form on the website.
The following are the main 3 reasons why contact form is superior to pasting your email address on a page.
Spam Protection- Spambots normally scrape sites for the mail to email address tag. When you post your email address on the site,
you will begin to get a lot of spam messages. On the other side, when you utilize a contact form, you can dispose of practically all spam messages.
Saves Time- Contact form saves a lot of time. By the help of a contact form, you can get entire information regarding the products and services.
Consistent Information- With a contact form, you can tell the client precisely what information you’re searching for, (for example, their telephone number, budget and so on).
Steps of adding Contact Form on WordPress
Step 1. Choosing the Best Contact Form Plugin
The first and most important step is to choosing the best WordPress contact form plugin. There are so many free and paid plugins that you can choose, WPForms is one of the best options in the market.
There are 3 reasons, why WPForms is the best:
- WPForms is one of the best and beginner friendly contact form available in the market. You can utilize the drag and drop builder to effectively make a contact form in only a couple of clicks.
- WPForms Lite is 100% free, and you can utilize it to make a straightforward contact form.
- When you are prepared for more extraordinary features at that point you can move up to WPForms Pro.
Let’s move on the next step.
Step 2.Add Contact Form On WordPress
Plugin in WordPress
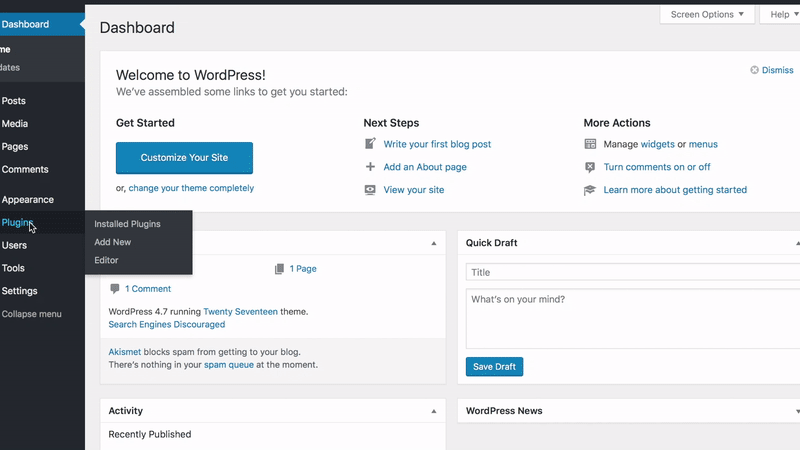
WPForms Lite is free and is very simple to use. Visit your WordPress admin account and log in to your WordPress dashboard and go to Plugins » Add New.
Write WPForms in the given search box and click on the Install Now button.
After installing the plugin, click on Activate.
Step 3. Create a Contact Form in WordPress
Now, most of the part is completed, you are ready to create a contact form in WordPress now.
Visit the WordPress dashboard and click on the WPForms menu and click on Add New.
WPForms Lite just accompanies two pre-built structure templates (Blank or Simple Contact Form). Yet, you can utilize these two to make pretty much any sort of contact structure you like.
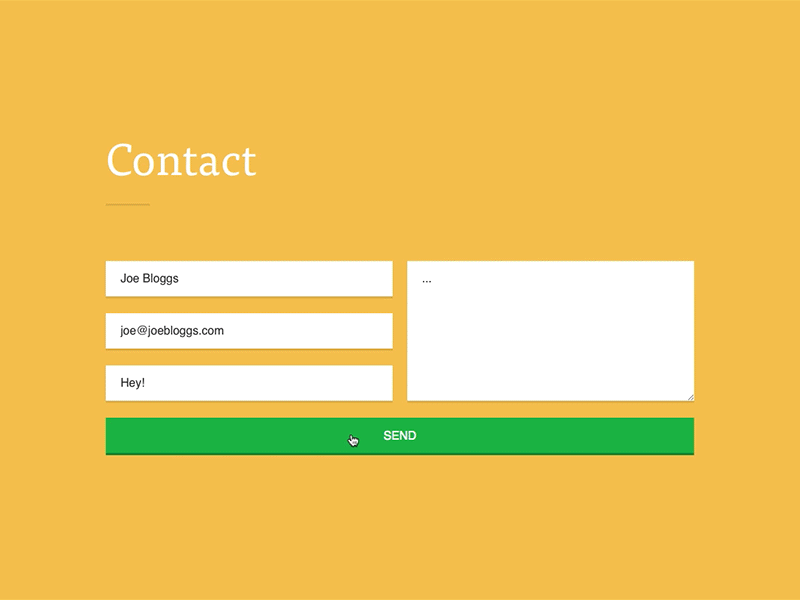
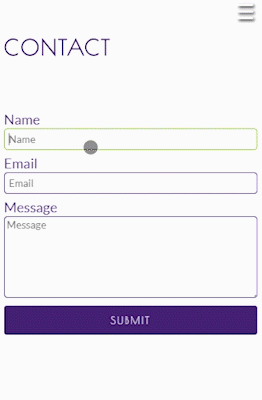
Choose a contact form template and add a name, email, and message fields.
You can edit any column and also use your mouse to drag the field order.
You will see various field options on the left and if you want to add new field then choose any one of the options.
After the completion of these steps click on the Save button.
Step 4. Configuring Form Notification and Confirmations
After the creation of WordPress form, it is important to configure the form notification and form confirmation.
Form Confirmation means the view of your website for your website visitors after the submission of the form and you can also redirect your visitors to a special page.
Form Notification means you will get an email after someone submits the form on your site.
If you want to change and edit anything in these two then you can customize it by visiting Settings option inside the WPForms form builder.
The best part about WPForms is that the default settings are perfect for beginners. When you go to the notification settings, all fields will be pre-filled powerfully.
The notifications are sent to the Admin Email that you have build up on your site. In the event that you need to send it to a custom email address, at that point you can change that. If you want to send the notification to different messages, at that point simply separate each email address by a comma.
The email subject is pre-filled with your structure name. The name field is consequently populated with your client’s name. When you answer to the request or inquiry it will go to the email that your client filled in the contact form.
Step 5. Adding WordPress Contact Form in a Page
After installation, activation, and configuring your WordPress form, it is the time to embed it in a page.The first and most important thing is to create a new page in WordPress but if you have an existing page then you can also add contact form in that page.We will utilize the WordPress contact form shortcode to include the structure in a page. Basically, click on the Add Form button at the top and select the form you need to add in WordPress.Now after the completion of the previous step, a contact form shortcode will be added in your page and after that save your page and preview it to see the changes.If you want to add a contact form only on your WordPress then it is done here, but if you want to add a contact form on a sidebar then you need to do one more thing-
Step 6. Adding WordPress Contact Form in a Sidebar
WPForms accompany a WordPress contact structure widget that you can use to include your contact form in a sidebar or fundamentally .
some other widget prepared area in your subject.
In your WordPress administrator zone, go to Appearance » Widgets.
You will see a WPForms widget that you can without much of a stretch drag into any widget prepared region of your subject or theme.
In the next step, add one title for your widget and select the form layout that you want to show.
Save the Settings and view the changes by visiting your website.